Thursday, 30 June 2011

June's Thursday Class


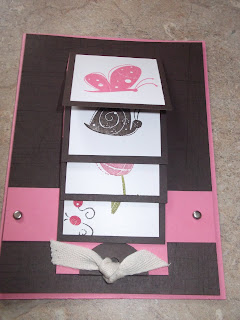
Last Thursday we made a waterfall card and a box envelope. This post will concentrate on the waterfall card but I will show you the finished box another time.
First of all I have to say a massive thank you to Georgina and Vicky who ran the class on my behalf. Good friends and sisters are like angels in disguise XXXXX
So back to the card, we used regal rose as the base followed by early espresso. This layer was stamped with the sanded background. The waterfall mechanism is real rose, early espresso and whisper white, and two silver brads.
This card looks so effective, and is easy to make (if I can do it so can you!) I found a you tube tutorial and watched it a couple of times and hey presto the card emerged. I also found some inspiration at www.haveagostampin.blogspot.com which is Jane's blog.
The stamp set we used was Garden Whimsy, and went down a treat with a number of my ladies as they like butterflies. We used regal rose and early espresso inkpads and then the markers in old olive, regal rose, real red and basic black.
Please leave me a comment and let me know what you think to the card.

Tuesday, 28 June 2011

Thank you cards


Sorry I haven't posted for a while. Lots of things going on at home at the moment which need my attention more than my blog and crafting.
I hope you will bear with me and I will post as and when I can. Normally my crafting is my salvation when things get a bit rough, but this time I just cant settle to do anything...
Now the photo above shows my thank you cards to the ladies who attended a workshop last week at Sharon's. Their goodies arrived this morning just as I was taking Hannah to school, so when I got back I had to make these little notes as I am sure Sharon will be collecting their goodies pretty quickly.
The stamp set is Hopeful Thoughts and Curly Cute for the greeting. The flower image was coloured in using the markers in regal rose, rich razzlebury and garden green. I just love the versatility of the markers so that images can be coloured just as you want them. The greeting was stamped in regal rose using the standard inkpad.
Thank you ladies for a great night and I look forward to bringing the new catalogue to you in October at Sue's party.

Monday, 20 June 2011

Jenny Moor's all day mini Extravaganza


At the beginning of June Georgina and I attended one of Jenny Moors extravaganza's. Check out Jenny's blog here www.stampingmoments.blogspot.com . You are also able to buy the class instructions from here.
We both had such a fab time and it was especially nice to be able to craft for ourselves instead of for a class or workshop. Jenny and her mum worked so hard to make the day lovely for all 38 of us.
The photo shows Georgina sat at the end of the day and the top one shows her place setting at the beginning of the day.

Sunday, 19 June 2011

Baby Card


One of Hannah's Cheerleading coaches had a baby girl at the beginning of this week and I wanted to send a card with Hannah on Saturday, but was pushed for time and could definitely not buy one as Clare's mum Jan comes to my classes!
We sent Clare the baby tri shutter card I made a while ago and then changed one of my Monday cards with a different greeting. I printed out my sentiment on the computer in pink and then punched out using the ex large oval punch and layered it up on one of the frames from the Four Frames set.
3 large pearls completed the look.
Thanks for stopping by X

Saturday, 18 June 2011

Circle Circus afternoon projects


The first project of the afternoon was this book mark. I have to be honest the idea was cased from Jenny Moors www.stampingmoments.blogspot.com . You need two jumbo lolly sticks and then cover them with pretty designer paper. I chose the Jolly Holly paper thoughout this class because it has lots of circles in its design. 2 decorative label punches some stamping and circle punches complete the look.
The second project was a slider box and inside were 3 tea lights onto which we stamped images from circle circus.
Again let me know if you would like to see this class available to buy.
Thanks for looking X

Friday, 17 June 2011

My Circle Circus Class


Last Saturday I held an all day class using the Circle Circus stamp set. I had 3 ladies on the day and 2 ladies who were unfortunately able to join us. Ladies I have your kits for you just let me know when you are able to do the projects.
The Morning was for card making and they made these 4 lovely cards. All the colour combinations were taken from the colour coach and I hope you agree that the results were striking.
If you are interested in purchasing the class instructions, please do let me know and I will have a go at converting them into a PDF document for you to purchase via paypal. (gosh I have just set myself a challenge haven't I!!!!)
Tomorrow I will show you the 2 afternoon projects.
Thanks for stopping by X

Tuesday, 14 June 2011

Monday Class Card 6


This was our last card of the evening and possibly another one for the men.
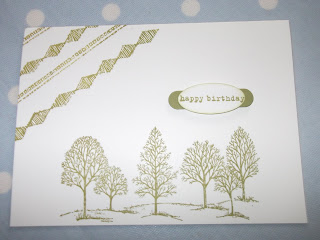
We have a whisper white base onto which we have stamped directly in old olive ink. We have used images from Plane and simple and Lovely as a Tree. The happy birthday was stamped and then punched out using the small oval and layered onto a word window punched shaped.

Monday, 13 June 2011

Monday Class Card 5


Here is a card for the men. We have a very vanilla base, then a layer of Cajun craze which has had the bottom decorated using the decorative label punch. We have run some marina mist cardstock through the big shot and square lattice embossing folder and then punched out using the 1 3/8" square punch.
The aeroplane was from plane and simple and stamped in Cajun craze onto scrap card and then hand cut and adhered using a dimensional.
The greeting is from Curly Cute.

Sunday, 12 June 2011

Monday Class Card 4


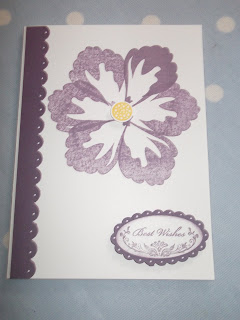
This was the more difficult card of the evening! We have a whisper white base and I used perfect plum cardstock and ink to accessorise.
The flower image comes from Build a Blossom in the mini catalogue and was stamped directly onto the base to form a flower shape. You can see that on my card I really inked up the first petal which gave a nice bold ink, but that I hadn't quite done the same on the others. These have more of a material effect! The centre piece was stamped in daffodil delight and punched out using the 1/2" circle punch.
We have used the scallop border punch along the side and dotted using the white stylo pen. The greeting is from Oval all and was stamped and then punched out using the oval punch and layered onto a scallop oval. Again we have used the pen to dot.

Saturday, 11 June 2011

Monday Class card 3


A Christmas card I hear you cry!! its only June............
While I was blog hopping I read that someone had decided to include a Christmas card in their class each month (I think it was Jane Cutting?) and thought what a good idea so decided to duplicate the idea at my class.
We have a whisper white base for this and then a layer of real red and another layer of whisper white for stamping on.
We have stamped in real red ink and the images are from Season of Joy. The sentiment is from Curly Cute. A little bit of daubering around the edges finishes of this card.

Friday, 10 June 2011

Monday Class Card 2


For this card we have a very vanilla base onto which we have stamped the sanded background stamp in regal rose. There is a strip of daffodil delight cardstock down the middle of the card and we created the notch at the bottom using the photo corner punch!
The greeting is from Perfect Punches and has been stamp in regal rose and then punched out using the large oval punch and adhered with dimensionals.
A nice, quick stylish card.

Thursday, 9 June 2011

Monday Class Card 1


Gosh I can't believe a month has passed since our last class.... This was the first card of the evening.
We have a very vanilla base followed by rich razzleberry and another layer of very vanilla for stamping on.
We used the scallop trim border punch on the top and bottom edges of the rich razzleberry card.
The butterflies come from the stamp set Flight of the Butterfly and were stamped onto scraps on cardstock in rich razzleberry ink and then punched out using the butterfly punch. The verse is stamped at an angle under the bottom butterfly so that it looks like the butterfly has left a trail.
The butterflies are adhered with a little bit of tombow in the middle, to leave the allusion of movement.

Wednesday, 8 June 2011

Pop Up card


A couple of weekends ago Georgina and I were playing and this is one of our finished projects.
Its called a pop up card and was in fact very easy to make. I think we will be making one of these at my Thursday class in the future.
I have used the fast and fabulous stamp set which is a level 2 hostess gift and Cottage Garden. The cardstock is pretty in pink, melon mambo and very vanilla. We used melon mambo and elegant eggplant inkpads.
We used a crop-o-dile to set the large eyelet and threaded through a piece of very vanilla ribbon.

Tuesday, 7 June 2011

Georgina's Photo Album


This was Georgina's contribution to the crafters companion competition.
Its a lovely photo album and uses very vanilla and early espresso cardstock and the DSP Jolly Holly again. See these papers aren't just for Christmas!
Inside are some lovely photos of our two youngest children. She has embellished using the rhinestone gems and some alphabet letters, which have been made using dies and putting them through the bigshot. We have to admit this isn't the SU alphabet as neither of us has it.

Monday, 6 June 2011

Cantilever Box


What do you think to our cantilever box then?
Georgina and I made this to show at Jenny Moors event on Saturday. She runs a crafters companion competition and to enter you must make something using only SU product, each person has one vote and the winner receives a £25 shopping spree courtesy of Jenny.
We have used old olive, cherry cobbler, early espresso and very vanilla cardstock together with DSP Jolly Holly.
We have used clear rhinestone brads and the sweet buttons embosslits to embellish together with buttons from the brights family and linen thread.

Sunday, 5 June 2011

Extra hostess benefits!!!!!!


Extra! Extra! Stampin’ Up! hostesses get extra hostess rewards 1 June-31 July, in addition to the already fantastic hostess benefits!

From 1 June-31 July, Stampin’ Up! hostesses can earn an EXTRA £20 to use toward Stampin’ Up! products of their choice when they host a workshop totaling £250 or more in product sales!
This extra benefit is in addition to the standard hostess benefits they receive when they host a workshop.

so what are you waiting for contact me today to book your workshop!

Sharon's Workshop


This is the card we made at Sharon's workshop last week. I wanted to show the big shot, but also included some stamping.

The base is pumpkin pie and then a layer of very vanilla. I have used the paper piercing tool and mat on one side of this layer. The panels are then layered with pumpkin pie and DSP blueberry crisp. The butterflies were made using the beautiful wings embosslits and cherry cobbler cardstock. A little bit of daubering around the edges finishes of this card.

Now the stamping occurs inside the card I promise. Sharon's guests were able to choose their greeting from Curly cute. I wanted them to be able to use the card! and not put it in a door and forget about it.

A big thank you to Sharon and her guests for a fab night.

Saturday, 4 June 2011

Mt Training swap for May 2011


This was my swap for last weekend's training with Jane Cutting. We try to get together once a month to share ideas, chat and of course there is a bit of crafting involved.
I decided that I haven't used the Funky Four stamp set since my extravaganza in April and came up with this idea using the many scraps of card from my stash. More and More I am trying to design cards that use up all the left overs.
My card base is Marina Mist and then I have layered a piece of whisper white card that has been put through the square lattice embossing folder to add some texture. Then there is a layer of real red and old olive cardstock. I have used the corner rounder on opposite corners.
The tree is stamped in old olive and punched out with the 1 3/4" circle punch. The greeting comes from Clearly For You and is punched out in the small oval and layered onto the larger one.
I have used the Marina Mist striped grosgrain ribbon and tried the bottom with some gold elastic thread.
For the ladies and gentlemen at training who didin't receive my swaps (I had left them on my kitchen table!) they are in envelopes ready to post.

Friday, 3 June 2011

I am Back!

Gosh it seems like I have not posted for ever...My only excuse is its been half term and I have had 3 children home as well as extra's as I try to help out friends and family whose working arrangements aren't as flexible as mine.

Well its the end of the week and my sister and I are in for a treat tomorrow. The children are all being farmed out this afternoon and we are on our way to a mini extravaganza held by Jenny Moors tomorrow. We are travelling this afternoon and staying with family tonight so we will only have a 20 minute journey tomorrow. Such a treat if you have viewed Jenny's work www.stampingmoments.blogspot.com .

Check back in next week and I will show you what we did.

I have taken some photos of things that I have been working on this week so posts should be daily next week if I get my act in gear!!!!

Thursday, 2 June 2011

Off the Bournemouth

Hannah has a cheer competition on Sunday in Bouremouth so we are off to the seaside after practice today.

Hoping that the sea air will lift all our spirits, and that the weather is dry so we can picnic/BBQ on the beach.